Menu Option: Tree: Insert Branches From Another Area
This option is used to import data located in another LEAP area into the current area at the currently highlighted branch. It can be useful if you wish to merge separate sectoral analyses into an overall integrated analyses. You can use it to import Demand branches, Transformation modules, Non-Energy sector branches, and Indicator branches. It will also optionally import and merge Key Assumption branches as well as all other types of data within a LEAP data set including scenarios, regions, fuels, effects, user variables, yearly shapes, lifecycle profiles, tags, constants, units, and references.
Using this option involves a number of steps as follows:
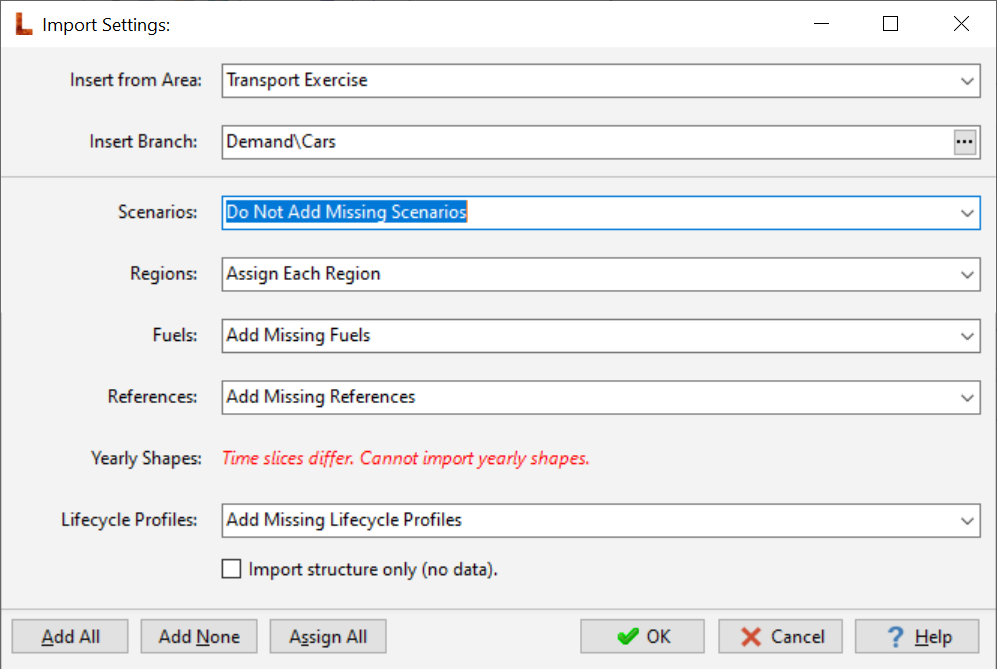
1. An introductory screen (shown below) let's you quickly set up the import
process. Here you select the source Area from which you wish to import
and the branches within that area to be imported. Once you have
selected a branch and an area, LEAP will scan for the types data that
need to be mapped and merged between the two areas. It will then
ask you how you want to handle that data for each type of data that differs
between the areas. Data may differ among scenarios, regions, fuels,
effects, user variables, yearly shapes, lifecycle profiles, tags, constants,
units, and references. For each type of data, you can choose to:
a) Add missing items from the source
area into the destination area,
b) Do Not Add missing data, or
c) Assign customized mappings for each individual item of each data type (e.g. adding some items, not adding other items and mapping other equivalent but differently named items). For example, two scenarios may be equivalent but named differently in two different data sets as Baseline and Reference.
Three buttons at the bottom of the screen allow you to quickly choose to Add All, Add None or Assign All for all types of data. If you choose the Assign options you will be asked to set up the mappings for individual elements in a later set of screens (one screen per type of data - see below). The introductory screen also let's you choose to import only data structures (i.e. not import any expressions). In the example shown below, the user has selected to imported the Demand\Cars branch from the "Transport Exercise" area. This will cause that branch and all branches below it to be imported into the destination data set. Because the source and destination area also differ in other ways, LEAP also ask the user to choose how they want to map and merge the differences in the scenarios, regions, fuels, references and lifecycle profiles. Note also that in this example, the two areas also have different time slice configurations. This prevents the yearly shapes (which are time slice-dependent) from being imported from the source to the destination area.
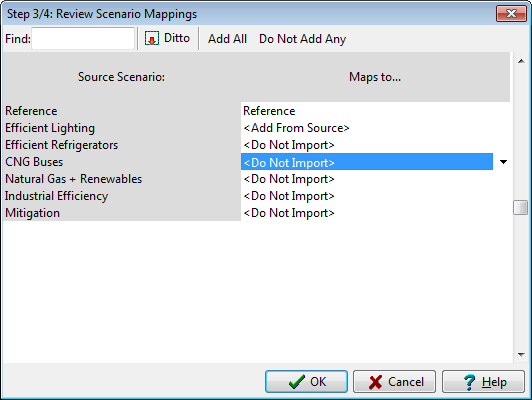
2. If, on the introductory screen, you have chosen to assign custom mapping for any particular type of data, then you will next be taken through a series of mapping screens (show below) to review and set up the import mappings for each type of data. In the screen shown below the user is reviewing the mappings for scenarios. For each scenario in the source area, you can choose to map that scenario to one of the scenarios in the destination area. Alternatively, you can add in scenarios from the source area that are missing in the destination area, or you can simply choose not to import a particular item. This screen also lets you search for items, use LEAP's "ditto" function (Ctrl+D) to copy values from the prior record, or set all items to be imported or not imported. Use the Hide Exact Matches option to show only items that do not match between the source and the destination. You will need to repeat this screen for each of the types of data listed in the introductory screen.
3. Once you have set all the above options, LEAP will start to import data. When handling Key Assumptions, LEAP will prompt you on how to handle any duplicate branches between the source and destination areas (as shown below). You can choose to overwrite expressions in the destination area or add branches to the destination area with a new name. For example, if there are branches in both the source and destination areas named "Key Assumptions\Population" then you can either overwrite that branch or have LEAP create a new branch named "Population {Copy From Source}"

4. Once the import process has completed, LEAP will display a summary of the data that has been imported. This report is also copied to the Windows Clipboard so that you can make use of it elsewhere.