See also: Tagging Branches, Tag Groups
Use the Tags
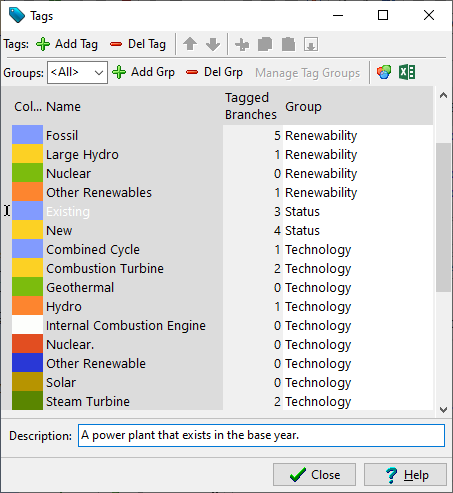
screen ( )
to view, edit and organize the tags for a LEAP area. Tags can be
used for color coding tree branches, for filtering and displaying results,
and for controlling the visibility of user-defined
variables. You can also use this screen to organize your tags
into groups: useful for organizing and displaying how results are viewed.
The Tagged Branches column shows you how many branches in the main LEAP
Tree have been tagged
with each tag.
)
to view, edit and organize the tags for a LEAP area. Tags can be
used for color coding tree branches, for filtering and displaying results,
and for controlling the visibility of user-defined
variables. You can also use this screen to organize your tags
into groups: useful for organizing and displaying how results are viewed.
The Tagged Branches column shows you how many branches in the main LEAP
Tree have been tagged
with each tag.
Click on a tag to edit its name, while at the foot of the screen you
can enter a longer description. Use the Add
( )
button to add a tag and the Delete
button (
)
button to add a tag and the Delete
button ( ) to delete a tag.
Use the Group selection box in the tool bar to filter the screen to
show all tags or any one group of tags. When showing one group of
tags you can also reorder tags using the Up
( )
and Down (
)
and Down ( ) buttons. Click
on the column titles to sort the tags by name or tag order. Note
that reordering of tags is only available when tags are displayed in order.
) buttons. Click
on the column titles to sort the tags by name or tag order. Note
that reordering of tags is only available when tags are displayed in order.
Use the Add Grp () button to
add a tag group and the Delete
Grp button ()
to delete a group. When selecting or deleting a group, LEAP will show
you the number of tags associated with each group in parentheses. You
can also access the separate Tag Groups screen
to manage groups of tags.
Click the ditto button ( ) to duplicate a field value
from the value immediately above it. The tool bar also gives you
access to the standard, copy, cut, and paste clipboard options.
) to duplicate a field value
from the value immediately above it. The tool bar also gives you
access to the standard, copy, cut, and paste clipboard options.
Use the Color Palette button
( )
to select a color palette. These colors are used when color coding
tags both in the Analysis view and in Results, including coloring branches
in the tree to indicate the tags associated with each branch.
)
to select a color palette. These colors are used when color coding
tags both in the Analysis view and in Results, including coloring branches
in the tree to indicate the tags associated with each branch.
Click the  button to export
the tags and their group names to Excel. Note that in Analysis View
you can separately export and import the lists of tags associated with
each tree branch.
button to export
the tags and their group names to Excel. Note that in Analysis View
you can separately export and import the lists of tags associated with
each tree branch.